


 The thought of diving headlong into Microsoft's radically new Windows 8 operating system is a little scary to many computer owners. For those who are cautious, never fear: you can have the best of both worlds.
 Windows 8 has gotten lots of buzz, and plenty of criticism, for its attempt to shake up your PC’s operating system. With so many big changes, you may want to keep your old Windows 7 OS on your machine, just so you have something familiar to ease the transition. Fortunately, you can work a little hard drive wizardry to make space for both the old and the new. Here’s how you can dual boot Windows 8 on a computer that already runs Windows 7.
Creating a System Image
The first thing that you’ll want to do is create a System Image from within Windows7’s Backup and Restore. When you do, you’ll end up with a complete image of your hard disk. That way, if anything out of the ordinary were to occur as you follow the steps for creating a dual-boot system, you will be able to return to your current configuration. Furthermore, I recommend that you also create a separate backup of your data. Maybe just make copies of all your data files on CD/DVD or on an external hard disk. While it may sound like overkill, having an extra backup will give you peace of mind.
To create a system image, you’ll need to have a CD-RW/DVD-RW drive, an external hard disk, or access to a network drive. To access Backup and Restore, click the Start button, type Backup in the Search box, and press [Enter] when Backup and Restore appears in the result pane.
Once you have Backup and Restore up, select the Create a System Image option and choose your backup location. As you can see in Figure A, I used an external hard disk attached to this system.
Figure A

On my test system, I’ll use an external hard disk to create my system image.
As you can see in Figure B, on this test system there is only one partition. To initiate the operation, just click Start backup. On my test system with a 500GB hard disk, it took just over an hour to create a System Image on an external hard disk.
Figure B

Creating a System Image on an external hard disk is easy.
When the System Image is complete, you’ll be prompted to create a System Repair disc, as shown in Figure C. This is the disc that you will use to boot your system and restore your system image in the event that you need it.
Figure C

When the System Image is complete, you’ll be prompted to create a System Repair disc.
Setting up a VHD
With your System Image completed, you’ll use the Disk Management tool to create the VHD on which you will install Windows 8. To launch Disk Management, click the Start button, type Disk Management in the Search box, and press [Enter] when Create and format hard disk partitionsappears in the result pane. When Disk Management launches, pull down the Action menu and select the Create VHD command, as shown in Figure D.
Figure D

You’ll select the Create VHD command from the Action menu.
When you see the Create and Attach Virtual Hard Disk dialog box, click the Browse button and use the Browse dialog box to create a folder and specify a name for your VHD file.
As you can see in Figure E, I have created a folder called VHDs in the root directory and named the VHD file Windows8RP.vhd. You will then specify a disk size and disk format. I have specified the size as 50GB and set it up as a Fixed size. You can use whatever size you want and chooseDynamically expanding format if you wish, just be sure that you have enough room on the hard disk to accommodate your VHD. (If you look back at Figure D, you can see that on my test system I have 350GB of free space and specifying a 50GB Fixed size VHD was an easy choice.)
Figure E

For my example VHD I choose a 50GB Fixed disk.
When you click OK, Disk Management will go to work creating the new VHD file. As it does so, you will see the progress in the Status bar, as shown in Figure F.
Figure F

Disk Management displays the VHD creation progress in its Status bar.
It will take a few minutes to create a Fixed size VHD file. When the VHD is complete, you will see the new disk in Disk Management, as shown in Figure G. Here you can see that my 50GB VHD is listed as Disk 2 and will notice that it is also marked as Unknown, Not Initialized, and Unallocated. Don’t worry; we’ll take care of establishing the disk during the Windows 8 installation procedure. A this point, you can close Disk Management.
Figure G

The new VHD will be marked as Unknown, Not Initialized, and Unallocated.
Installing Windows 8
Now that you have your VHD established, installing Windows 8 in a dual-boot configuration should be a pretty straightforward operation. Let’s take a closer look.
To begin, insert the Windows 8 Release Preview DVD and reboot your system. After a few minutes, you’ll see the Windows Setup screen shown in Figure H and will specify your language settings before clicking Next.
Figure H

The first step in the installation is to specify your language settings.
Once the initial steps are taken care of, you’ll see the Windows Setup screen shown in Figure Iand will click the Install Now button. However, keep in mind that we aren’t exactly ready to install Windows just yet; you must first access your VHD.
Figure I

While you will click the Install Now button, you’re not quite ready to install Windows 8.
When you see the next Windows Setup screen, you will immediately press Shift +F10 to open an Administrator Command Prompt window as shown in Figure J.
Figure J

When you press Shift-F10, you’ll see an Administrator Command Prompt window.
To prepare your VHD you’ll use the command Diskpart utility. Follow these steps:
- Type the command:
diskpart
- Once the Diskpart environment is ready, you’ll use the select command to instruct Diskpart to access your VHD file as follows:
select vdisk file=c:\VHDs\Windows8RP.vhd
- After you have selected the VHD file, you’ll use the attach command to essentially connect the VHD to your system as follows:
attach vdisk
This entire procedure is illustrated in Figure K.
Figure K

After each command, you should see a success message.
Once you are done, you can type exit to leave the Diskpart environment and then click the Close button the close the Administrator Command Prompt window. When you return to the Windows Setup screen, you select the Custom option, as shown in Figure L.
Figure L

Make sure that you select the Custom Install Windows only option.
At this point, Windows Setup will prompt you to choose the location to which you want to install Windows 8 and you can now select your VHD, which will be designated as Unallocated Space and be the size that you specified.
As you can see in Figure M, I have selected my 50GB VHD. Keep in mind that when you select the VHD, you’ll see a Warning message that says that Windows cannot be installed to this disk. Even though Windows Setup displays this warning message, you can ignore it as the procedure does indeed function correctly. In fact, the installation procedure will progress quite rapidly and restart several times as it completes the installation on the VHD - just like it would on a normal hard disk.
Figure M

Select your VHD drive, ignore the warning message, and click Next.
As soon as you click Next, the installation will begin, as shown in Figure N. This part of the operation will take a while so go get yourself a cup of coffee.
Figure N

As soon as you click Next, Windows Setup will begin copying files to the new partition.
Dual-booting Windows 7 and Windows 8
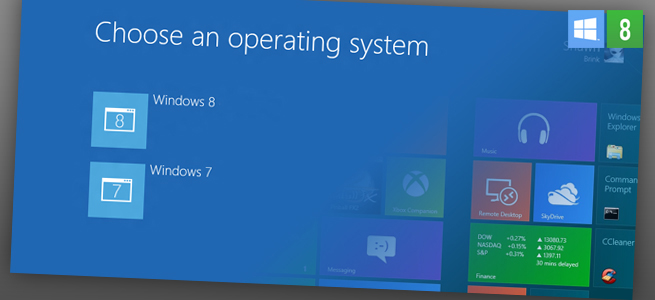
When the installation is complete, Windows Setup will reboot your system one final time and you will then see the new Windows 8 style dual boot screen shown in Figure O. As you can see, Windows 8 will automatically launch in 30 seconds if you don’t choose Windows 7.
Figure O

The new Windows 8 style boot screen display for 30 seconds before launching Windows 8.
If you want to alter the amount of time before Windows 8 runs, you can click the Change defaults or choose other options at the bottom of the screen.


You want to know what you spouse does with their phones,you want to know what happens when you are away from home,do you need a classified hacker to hack,you need to upgrade your credit score and delete your criminal records,contact victorhacks@gmail.com